I am so excited to be getting my groceries delivered again! Ocado put on a deal where you can get as many mid-week (Tues-Thurs) deliveries you want for £2.99 a month. Or was it £3.99? Cheap anyway. Even if I only use it once or twice a month.
So the groceries just came and just in time too because we have been running out of basics like eggs and fruit. I nearly had to give my son ice cream for breakfast! (He usually refuses oatmeal).
The funny thing is though, that I actually struggled to fill my basket with £40 worth (the minimum order). This is because I am trialing a new vegetable box scheme tomorrow. The company I chose provides fruit, veg, meat, dairy, and pantry items. So I am trying out their medium fruit and veg box, eggs, milk, chicken, beef, and sausages. As a result I didn't want to put any of those items in my Ocado delivery. If the veg box works out well, I may not need Ocado nearly as much. The veg box scheme people have a minimum order of £25 for their meat products, which is certainly more meat than we eat in a week. Or rather, more than we can afford in a week. So I will have to weigh up the pros and cons of local, organic, expensive meat, versus Ocado's meat prices from not so local farms....
I am also thinking about trying a few different veg box schemes over the coming months. To see which companies, produce, and prices I like the most. I chose this one to try first because they sell dairy as well.
I am not sure that we will be self-sufficient in veg this year because I am too big and uncomfortable to dig in the garden at the moment, and I don't know how much I will get done with a small baby. The nice thing about all of these schemes is that you can order for the weeks you want and stop when you need to.

Tuesday, 29 March 2011

Kitchen Hints
These are some of our top hints for saving money and saving your sanity!
- Purchase in bulk where possible. Good places to buy grains, beans, and tins include ethnic shops, Cash and Carry (such as Costco), and larger supermarkets. I have also found some really good deals online by searching for "bulk whole foods." You can purchase fresh produce, especially potatoes from farm shops.
- It may seem counter intuitive to splash out on a lot of storage containers, but they really do help preserve food, and they keep you from losing packets of things at the back of the cupboard. Glass is an ideal material, but I admit that most of my containers are Lock-n-Lock plastic ones at the moment. Good places to find food storage containers are those inexpensive shops with loads of plastic items stacked up outside. Most towns have a shop like this. This is where I get canning jars, large plastic boxes for pet food and grains, and baskets. Lakeland has a nice selection of containers including Lock-n-Lock, but if you really want to see a range, search the Internet.
- Menu plan! Not only does menu planning make it easier to shop and stay in budget, but it is so much easier to prepare dinner when you don't need to make last minute decisions.
- Cook once, eat twice (at least). If you roast chicken on Sunday, use the leftovers for a stir-fry on Monday night, sandwiches on Tuesday, and meanwhile make and freeze stock and chicken soup for later in the month. Only keep leftovers two days in the fridge for health and safety. When I make a casserole I make two. One to eat now, preferably for two days, and one to freeze for later in the month.
- Freeze bread before it goes off. Even small crusts can be frozen to make breadcrumbs when you need them. We don't eat a lot of bread in our house, so we almost always freeze our loaf and take out slices to toast when we want them. I often buy bread and croissants from the sale rack to freeze.
- Make and freeze your own muffins. They are cheaper, healthier, and tastier. I often have batches of oatmeal, blueberry, and white chocolate cranberry muffins in the freezer ready to defrost for breakfast or the lunchboxes. Everyone in my house likes different varieties, so I could never get through a dozen of one kind before they go off.
- Many dairy products freeze well. This is useful when you have a carton of cream or milk which is about to go off, but you cannot find the time to use. I also purchase extras when they are on sale. If I keep butter, cheese, milk, cream, and yogurt in the freezer I will never be caught out.
- I find the easiest way to store cheddar is to buy a month's worth, shred it and freeze it. If you pack this loosely you can easily dig a spoon in to spread over toast or over the top of a casserole. Parmesan also freezes well once shaved or grated. I often find these cheeses go off before I can use them up, so this method results in much less waste.
- Embrace homemade oatmeal. Oatmeal takes less than five minutes on the stovetop or three minutes in the microwave. See recipes section for a few ideas. Why spend money on little packets? You can add the toppings you like, making it healthy with ground seeds and fruit or indulgent with golden syrup.
- Use reusable containers for drinks, lunchboxes, leftovers, and food storage. Disposable bags and wraps really add up over the year and do not do the environment any good--even if you can recycle them. There are loads of plastic, metal and glass containers on the market these days. Or save and reuse your glass and plastic containers.
- Use cloth napkins, washing up cloths, dusters, and towels instead of paper. They are cheaper and again better for the environment.
- Give each member of the household a big mug to use. Each person can use their mug for both hot and cold drinks during the day, washing/rinsing it as needed. This saves on the washing up and if you find one left where it shouldn't be you know the culprit!
- We also have bowls and plates which work on the same principle. You can purchase a set of six different coloured bowls, plates or cups from most grocery stores or IKEA. This makes it easier to prepare lunches and snacks for picky eaters and know whose plate is whose.
- Store like things together. Place baking supplies together in the same cupboard. Gather small packets of sprinkles, essences, and baking powder in baskets or large tins. Place all of the baking utensils, measuring cups, etc together in one drawer.

- Go through your junk drawers to make room in one large drawer. Fill this drawer with all of your barbecue stuff. Long utensils, gloves, mesh baskets, plastic plates and even condiments. These items are always awkward to store anywhere else and really need a home of their own.
- I love the racks you can get to store chopping boards, pans, and trays. They don't cost that much and make life so much easier.
- Recycle, recycle, recycle. And get a good system going to make it easier on yourself. No great tips---I just think this is important.
- Save money by buying snacks in large bags and then putting them in smaller snack containers for lunchboxes. (Reducing the amount of junk food your family eats is also healthy and better for the budget).
- Don't buy juice. Okay, I cannot seem to get my family to go with this one either. Studies have shown that not only is juice really bad for the teeth, but that it does not contain very many nutrients after it has been pasteurised. We eat loads of fruit in our family, which is healthier as it contains healthy fibre as well. Our health visitors told us not to give the kids fruit juice or any fizzy colas, etc. But we didn't listen and so we have an extra unnecessary expense each week. We do water down our juice with water or sparkling water, which helps a bit.
- Keep track of your diet for free with Sparkpeople.com. You can do this on a computer or using a free app for your mobile. You can input your daily food and they calculate your calorie intake and how much exercise you need to do to achieve your goals. (Please check their guidelines for use and to see if you agree with their dietary advice before using).
- Eat fruit and vegetables in season to save money.
- Use ingredient searches on recipes websites such as allrecipes.com to help you cook from your pantry.
- Try buying cheaper versions of food and household goods. Sometimes stores sell their own brands in two versions. One has plain packaging and one as a picture on it or a pull-top lid. The products inside are often exactly the same! Buying the cheaper versions works especially well with items you will be cooking with and some cleaning products. If you don't like it, go back to your own brand.
- If you are anything like me and get tempted to throw extras in your trolley, shop online and have your groceries delivered. I save money on petrol and by sticking to my budget even if I need to pay a bit for delivery. I am much more disciplined with my budget and I no longer have to deal with toddler tantrums---or Mummy tantrums at the store. See my post on my favourite UK online delivery service, Ocado.
- I cannot live without my family calendar. It has six columns for six people or categories, tear off to do and shopping lists, and comes with stickers to liven things up a bit. Mine is from OrganisedMum.com, but there are plenty out there if you have a look. The one advantage to this company is that they make so many different versions. You could have ones with fewer columns, or a desktop diary version, larger places to write, wipe off sections, shopping lists, party planner books, etc. So you can really choose which calendar will best suit your family.

Sunday, 27 March 2011
House Rules
These are a collection of house rules I have gathered from family and friends. The ones in bold are the ones we try to follow in our household. What about you? What gets you through?
- Any food leaving the kitchen must be on a tray.
- Food and drink must be consumed in the kitchen. Adults can bring drinks elsewhere in the house.
- Story time is 7:30 pm. If you have tidied your toys, brushed your teeth and put your pajamas on you can join in.
- Snacks kept on a certain jar/shelf/bowl are free-for-all during the day. For any other food, children need to ask permission.
- Everyone is in charge of putting their dirty clothes in the hamper and hanging up their own towels.
- Everyone needs to brush their teeth at least twice a day.
- Sharp knives are never placed in the sink to prevent nasty accidents.
- All knives are placed facing down in the dishdrainer.
- Cats are not allowed on the dining tables or countertops.
- Toys are not allowed in the living room.
- Toys must be tidied before bed.
- Everyone does their own laundry (I did this from age 7)
- And ironing (I did this from a slightly older age)
- Crafts, painting and play dough are done at the kitchen table (which is wipe-clean)
- We do not do punishment in our family. We believe in natural consequences. We do not use the naughty step. We do not threaten with consequences that we will not actually carry out. We do not insult, name-call or belittle children.
Saturday, 26 March 2011
Homemade Ginger Beer
I am a big fan of ginger ale and ginger beer and ginger tea...ginger biscuits..... This version of ginger beer is a bit fizzy because it is lacto-fermented using whey. It is full of natural ingredients and probiotics. It is very easy to make and lasts for a while in the fridge. You can add some homemade natural sugar syrup or stevia if it is not sweet enough to your taste.
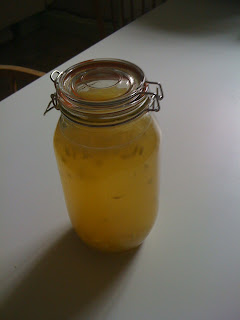
The recipe is from Nourishing Traditions, and I found it on one of my favourite websites, The Nourishing Cook.
You will need:
3/4 cup fresh ginger, peeled and chopped/grated
1/2 cup fresh lime juice
1/4-1/2 cup Rapadura (I used demerara because Rapadura is hard to find here in the UK)
1/4 cup whey
2 teaspoons sea salt
2 quarts filtered water
Mix all of the ingredients together and place in a 2 quart jar, leaving an inch of room at the top. Cover and allow to ferment on your countertop for 2-3 days. Store in the fridge. According to Nourishing Traditions you can add some fizzy water to serve. It is meant to be used slightly warm and consumed in small quantities at a time. It will keep in the fridge for several months.
There are loads of other, very similar recipes available online. There is one on Instructables.com which makes one quart if you feel that you want to make a smaller batch for your first efforts. It uses honey, but needs 3-7 days to ferment. This could produce too much CO2, so might need to be opened every couple of days. And there are several recipes out there which do not require whey, which would be handy if you don't have any on hand.

The recipe is from Nourishing Traditions, and I found it on one of my favourite websites, The Nourishing Cook.
You will need:
3/4 cup fresh ginger, peeled and chopped/grated
1/2 cup fresh lime juice
1/4-1/2 cup Rapadura (I used demerara because Rapadura is hard to find here in the UK)
1/4 cup whey
2 teaspoons sea salt
2 quarts filtered water
Mix all of the ingredients together and place in a 2 quart jar, leaving an inch of room at the top. Cover and allow to ferment on your countertop for 2-3 days. Store in the fridge. According to Nourishing Traditions you can add some fizzy water to serve. It is meant to be used slightly warm and consumed in small quantities at a time. It will keep in the fridge for several months.
There are loads of other, very similar recipes available online. There is one on Instructables.com which makes one quart if you feel that you want to make a smaller batch for your first efforts. It uses honey, but needs 3-7 days to ferment. This could produce too much CO2, so might need to be opened every couple of days. And there are several recipes out there which do not require whey, which would be handy if you don't have any on hand.
Friday, 25 March 2011
Half a Lamb
Yesterday we took delivery of half a lamb from the guy who rents one of the farm fields for his sheep. I admit I am still squeamish about eating lamb I watched grow up--especially after being vegetarian for ten years. Never mind the the ten years of eating meat since! I still struggle with the idea of eating meat and rather like the packaged stuff we get from the supermarket. Ideally I prefer organic or free range meat because I am nervous about the hormones and things fed to animals these days. I am also concerned about animal welfare and prefer to eat "happy" animals if that is possible!
I love that this lamb is local and that it tastes so good! Here is the UK most of our lamb is imported from New Zealand. And although I know that New Zealand is well known for its lamb, the taste just does not compare to some of our local stuff. In fact, during my last pregnancy I couldn't eat lamb because I thought it had too strong a flavour. Whereas I have managed to eat plenty of our last half a lamb and I have been looking forward to this delivery.
It cost us £45 for half a lamb, which was butchered and wrapped ready for the freezer. This lasts us a few months if we are careful. Our first chops (my least favourite cut) last night were great.
Finding a small, independent supplier like I have might not be easy, but you can always check your local butchers for prices. A good option is salt marsh lamb It is a bit expensive, but some of the most delicious we have had. Go in with a friend and you may get an even better price. Sheep are free range anyway, so if the organic aspect does not matter to you, then you can save a bit.
I love that this lamb is local and that it tastes so good! Here is the UK most of our lamb is imported from New Zealand. And although I know that New Zealand is well known for its lamb, the taste just does not compare to some of our local stuff. In fact, during my last pregnancy I couldn't eat lamb because I thought it had too strong a flavour. Whereas I have managed to eat plenty of our last half a lamb and I have been looking forward to this delivery.
It cost us £45 for half a lamb, which was butchered and wrapped ready for the freezer. This lasts us a few months if we are careful. Our first chops (my least favourite cut) last night were great.
Finding a small, independent supplier like I have might not be easy, but you can always check your local butchers for prices. A good option is salt marsh lamb It is a bit expensive, but some of the most delicious we have had. Go in with a friend and you may get an even better price. Sheep are free range anyway, so if the organic aspect does not matter to you, then you can save a bit.
Potato Pancakes
Dad used to make banana bran pancakes every Sunday. But every once in a while he would make potato pancakes made from leftover mashed potatoes from the night before.
I like to make a variation of these and serve them for lunch or dinner. They are a lot like Bubble and Squeak, a classic British leftover dish.
You will need:
Leftover mashed potato (mine usually has milk, butter, salt and pepper in it)
fresh or frozen spinach or greens--or leftover cooked greens
nutmeg
pinch of flour (optional)
butter or oil for frying
1. Warm the potatoes with a tablespoon of water if you need to. (Microwave or stove top).
2. Meanwhile prepare your greens. If using frozen spinach I usually place a chunk of spinach in a mug of boiling water (from the kettle) and place in the microwave for a minute. Or let it sit for a five minutes. If using fresh greens then I chop and shallow fry in water or a touch of oil. When using leftovers I just pop them in the pot with the leftover mash to reheat.
3. When the potatoes are soft, mix in the greens, nutmeg, flour, and additional salt and pepper if needed.
4. Heat the butter or oil in a frying pan over medium/high heat. Dollop spoonfuls of your mixture onto the pan. Fry until browned on one side, flip and brown the other side. This may take 3-5 minutes per side. They should be able to hold their shape when flipped, but they will remain mushy in the middle.
5. Serve on their own or with just about anything. (They go perfectly with an egg or two).
I like to make a variation of these and serve them for lunch or dinner. They are a lot like Bubble and Squeak, a classic British leftover dish.
You will need:
Leftover mashed potato (mine usually has milk, butter, salt and pepper in it)
fresh or frozen spinach or greens--or leftover cooked greens
nutmeg
pinch of flour (optional)
butter or oil for frying
1. Warm the potatoes with a tablespoon of water if you need to. (Microwave or stove top).
2. Meanwhile prepare your greens. If using frozen spinach I usually place a chunk of spinach in a mug of boiling water (from the kettle) and place in the microwave for a minute. Or let it sit for a five minutes. If using fresh greens then I chop and shallow fry in water or a touch of oil. When using leftovers I just pop them in the pot with the leftover mash to reheat.
3. When the potatoes are soft, mix in the greens, nutmeg, flour, and additional salt and pepper if needed.
4. Heat the butter or oil in a frying pan over medium/high heat. Dollop spoonfuls of your mixture onto the pan. Fry until browned on one side, flip and brown the other side. This may take 3-5 minutes per side. They should be able to hold their shape when flipped, but they will remain mushy in the middle.
5. Serve on their own or with just about anything. (They go perfectly with an egg or two).
Sourdough Starter Failure!!
I have been wanting to do this for years! I love sourdough bread and it is both hard to find and expensive here. Tescos does a nice white loaf, but it currently costs £1.79. I think that I can make my own which will be healthier, cheaper, organic, and not too difficult. I already use my bread machine a fair bit because I have arthritis which makes kneading dough difficult for me. The AGA is also really unreliable in that it cooks unevenly and you can't control the temperature. So, although AGAs are known to be great for baking, mine definitely is not! I hope this starter will add a new and healthy dimension to my breadmaking.

In researching how to make sourdough starters I have found dozens of different versions. I have settled on one I found from Hubpages.
You will need:
Organic rye flour
Organic bread flour (I am using spelt)
water
bowl
plastic wrap
Day 1 Mix together one cup of whole wheat or rye flour with 3/4 cup of water. Make sure all of the dough is wet. It should make a ball. Keep in a clean bowl and cover with plastic wrap. Leave at room temperature for one whole day. (Mine was more wet and did not make a ball. Most of the recipes I read said to make a soupy mixture, so let's hope this works out ok!)
Day 2 Mix together one cup of bread flour with 1/2 cup of water. Add this to the bowl and mix well. The mixture may be softer, without any rise. Cover again and leave for another day. (I used rye again. Hope this is ok!)
Day 3 Mix 1 cup of bread flour and 1/2 cup of water. Discard half of yesterday's dough. Mix in the new mixture. Cover and leave again. It should be rising a little by now.
Day 4 Repeat Day 3. Wait a few hours until the dough has doubled. Take one cup of starter and mix with 3 1/2 cups of bread flour and 2 cups of water. Mix and cover with plastic. After 6 hours it will have doubled and become bubbly. You can now use this starter in a recipe.
Store this starter in the fridge. It should last forever with proper feeding. Feed the starter every three days and every time you use it. (If you use it every 2-3 days for breads, pancakes, etc this should be easy). To feed, take away half of the culture and mix in equal flour and water in a 3/2 ratio.
OK, so this worked really well on days one, two and three. Then on day four I followed the directions and waited for it to bubble up. And waited and waited overnight because it was getting late.
And nothing. Now I have had a look on the Internet for other recipes and guidance. I can only guess as to what has gone wrong. I think there are a few possibilities. Firstly, I used organic rye flour on days one and two, then organic spelt flour on days three and four. Not sure if this is that big a deal really. Secondly, I used a metal spoon to stir on days three and four. This did not affect the mix on day three, but could well have done by day four. (I read that you should avoid using metal after the fact). And thirdly, although it was a warm day, my kitchen was suddenly much colder on the fourth day. And apparently the starter needs to have a fairly warm temp to get going.
So fortunately flour is cheap and I have enough to have another go. I am now trying to decide which methods and which flour to use, because there are so many! Rye is supposed to work very well, so I will likely stick with it. So here I go again.


In researching how to make sourdough starters I have found dozens of different versions. I have settled on one I found from Hubpages.
You will need:
Organic rye flour
Organic bread flour (I am using spelt)
water
bowl
plastic wrap
Day 1 Mix together one cup of whole wheat or rye flour with 3/4 cup of water. Make sure all of the dough is wet. It should make a ball. Keep in a clean bowl and cover with plastic wrap. Leave at room temperature for one whole day. (Mine was more wet and did not make a ball. Most of the recipes I read said to make a soupy mixture, so let's hope this works out ok!)
Day 2 Mix together one cup of bread flour with 1/2 cup of water. Add this to the bowl and mix well. The mixture may be softer, without any rise. Cover again and leave for another day. (I used rye again. Hope this is ok!)
Day 3 Mix 1 cup of bread flour and 1/2 cup of water. Discard half of yesterday's dough. Mix in the new mixture. Cover and leave again. It should be rising a little by now.
Day 4 Repeat Day 3. Wait a few hours until the dough has doubled. Take one cup of starter and mix with 3 1/2 cups of bread flour and 2 cups of water. Mix and cover with plastic. After 6 hours it will have doubled and become bubbly. You can now use this starter in a recipe.
Store this starter in the fridge. It should last forever with proper feeding. Feed the starter every three days and every time you use it. (If you use it every 2-3 days for breads, pancakes, etc this should be easy). To feed, take away half of the culture and mix in equal flour and water in a 3/2 ratio.
OK, so this worked really well on days one, two and three. Then on day four I followed the directions and waited for it to bubble up. And waited and waited overnight because it was getting late.
And nothing. Now I have had a look on the Internet for other recipes and guidance. I can only guess as to what has gone wrong. I think there are a few possibilities. Firstly, I used organic rye flour on days one and two, then organic spelt flour on days three and four. Not sure if this is that big a deal really. Secondly, I used a metal spoon to stir on days three and four. This did not affect the mix on day three, but could well have done by day four. (I read that you should avoid using metal after the fact). And thirdly, although it was a warm day, my kitchen was suddenly much colder on the fourth day. And apparently the starter needs to have a fairly warm temp to get going.
So fortunately flour is cheap and I have enough to have another go. I am now trying to decide which methods and which flour to use, because there are so many! Rye is supposed to work very well, so I will likely stick with it. So here I go again.

Subscribe to:
Posts (Atom)