Showing posts with label Dinner. Show all posts

Monday, 8 August 2011

Eggy Rice


When we are in a hurry and the fridge is bare, we find ourselves inventing dishes.  Tonight I went for this,a variation on Egg Fried Rice (another quick favourite of mine). 

You will need:

olive oil
leftover rice (any sort)
1-2 eggs per person, beaten
salt and pepper

optional:  chopped onion, and/or other veg

1.  Fry a bit of olive oil in a pan and add the rice to warm up, stirring frequently.  Fry the veg if using.
2.  Add beaten egg.  Stir as you would scrambled eggs for two minutes, then flatten in the pan.  Turn or flip the mixture over and cook until the egg is thoroughly cooked.
3.  Season with salt and pepper.  Serve with vegetables if desired.


Friday, 25 March 2011

Potato Pancakes

Dad used to make banana bran pancakes every Sunday.  But every once in a while he would make potato pancakes made from leftover mashed potatoes from the night before. 

I like to make a variation of these and serve them for lunch or dinner. They are a lot like Bubble and Squeak, a classic British leftover dish.

You will need:

Leftover mashed potato (mine usually has milk, butter, salt and pepper in it)
fresh or frozen spinach or greens--or leftover cooked greens
nutmeg
pinch of flour (optional)

butter or oil for frying

1.  Warm the potatoes with a tablespoon of water if you need to.  (Microwave or stove top). 
2.  Meanwhile prepare your greens.  If using frozen spinach I usually place a chunk of spinach in a mug of boiling water (from the kettle) and place in the microwave for a minute.  Or let it sit for a five minutes.  If using fresh greens then I chop and shallow fry in water or a touch of oil.  When using leftovers I just pop them in the pot with the leftover mash to reheat.
3.  When the potatoes are soft, mix in the greens, nutmeg, flour, and additional salt and pepper if needed.
4.  Heat the butter or oil in a frying pan over medium/high heat.  Dollop spoonfuls of your mixture onto the pan.  Fry until browned on one side, flip and brown the other side.  This may take 3-5 minutes per side.  They should be able to hold their shape when flipped, but they will remain mushy in the middle.
5.  Serve on their own or with just about anything.  (They go perfectly with an egg or two).

Friday, 4 February 2011

Rumpledethumps

Moosewood restaurant became famous for its vegetarian fare and its selection of cookbooks.  My mother had a few of their books when I was a teenager and I especially liked a few recipes from this one.  On Sundays the menu would change to include ethnic fare.  Although there were recipes from all over the world, my favourites were some from the British Isles!

This potato and vegetable casserole recipe is from memory, because I don't have the book and I have made it many times over the years.  I hope it is mostly accurate.  It is very similar to "colcannon."  I have not written this out step by step.  I hope you get the idea.

Rumpledethumps

  1. Make some mashed potatoes and season as you normally would.  (I mash with butter, milk, salt and pepper).
  2. Steam or boil a leek, some chopped broccoli, and chopped cabbage.  When tender, mix with butter, salt, pepper, and a pinch of nutmeg.
  3. Mix the mash and veg together.
  4. You can eat it like this.
  5. Or you can place it in a casserole dish, top with shredded cheddar cheese, and pop in the oven until golden brown.
You can make large quantities and freeze this is casseroles as part of the Cook once for the month.  You can serve this on its own as a vegetarian meal or as a side dish for meat.  We have it with good quality sausages---Irish ones work especially well if you can find nice ones.

Tuesday, 4 January 2011

Ugali


Ugali, fried tilapia, sukumawiki


Ugali is a staple starchy food much like potato or pasta in other cultures.  Ugali is made from maize flour and is used in many parts of Africa.  It is has many names, such as sadza in Zimbabwe.  In some parts of Africa semolina (made from wheat) is used in a similar way.  Ugali is usually prepared with water and is very plain.  It is served with stews or other wet foods.  It is eaten with your hands and can take some practice!  Make a small ball of ugali in your right (always the right!) hand,  flatten it slightly and use this to scoop your stew.

Meals are always served with a bowl of warm water, perhaps with a slice of lemon.  This is passed around to wash your right hand before and after the meal.  I have a friend from Zimbabwe who comes around with a bowl and a pitcher of warm, lemony water which she pours over your hand.  A lovely ritual.


You will need:
fine white maize
water
saucepan
wooden spoon

  1. Fill half of a medium size pan with water and bring to the boil.


2.  Take a few spoonfuls of boiled water and add to 1/4 cup of maize in a bowl.  Mix with additional cold water and stir until the maize is smooth.  .


Add back to the pan and stir almost constantly to prevent lumps on the bottom of the pan.  Boil and stir for a further few minutes until the mixture boils.

3.  Next, add one cup of maize and begin to stir quite vigorously.  It is quite like mashing potatoes.  You are looking to smooth out any lumps quite quickly.  If it is still quite wet you can add another 1/4 cup of maize.  When it is smooth it is ready to be moved to a burner with low heat.  Place a lid on it and leave it for ten minutes.  You can check on it and give it a stir a few times. 


4.  The ugali is then emptied out onto the serving plate.  It is quite firm at this stage, and stands up on its own in a mound. 


Ugali, fried tilapia, and sukumawiki


Traditional "Mwiko" which is a flat wooden spoon used to make ugali.
 

Monday, 3 January 2011

Flavourful Fish

This is my favourite way to cook just about any kind of fish.  Steaming the fish in the microwave is not only quick, but healthy too.

You will need:

Fillet of fish per person
one small tomato, sliced
1/4onion sliced
bay leaf
peppercorns
Salmon seasoning (optional)

glass dish or silicone fish steamer
plastic wrap (if using glass dish), or tight fitting lid

  1. Place the slices of onion and tomato on the bottom of your glass dish, making them as flat as possible.
  2. Place fillets of fish on top of the vegetables.
  3. Add a bay leaf and some peppercorns and seasoning if using.
  4. Cover the dish with plastic wrap and microwave for a minute and a half. 
  5. Check to see if fish is cooked through.  Add more time, half a minute at a time, depending on the power of your microwave.  You may need more time if you are doing two or more fillets at once.  Many microwaves have automatic "fish" settings these days which will take this guesswork out for you.  (One salmon fillet in my microwave takes 1.5 minutes).  You want fish which is opaque through.  Since it is steamed it should also be moist.
  6. Be careful when checking and serving because the steam is hot!
  7. Serve with ugali, rice or new potatoes and vegetables.

Sunday, 2 January 2011

Sukumawiki

Sukumawiki means "push the week" in Swahili.  It refers to a vegetable dish you have to resort to when there is no money left for meat and all you have is greens from your garden.  Since greens are one of the things I can actually manage to grow successfully in my garden we eat this weekly.  We use any kind of greens, like cabbage, Swiss Chard, and spinach.  We often use frozen spinach in the winter months. 

This makes up part of one of our favourite meals: fish, ugali and sukumawiki.  It is actually my son's favourite meal.  We eat it at least weekly and I am always amazed at how such a picky eater gobbles down spinach and fish!


You will need:

Small onion
Cumin seeds
2 Tomatoes, chopped (optional)
Greens, chopped and washed--leave wet
  1. Slice and fry the onion in a little bit of oil in a large frying pan until quite soft.
  2. Add cumin seeds to toast lightly.
  3. Add tomatoes if using and stir for 2-3 minutes.
  4. Add greens and allow to wilt.  Stir as needed until the greens are all wilted and the ingredients are well mixed.  Add salt and pepper to taste.
  5. Serve on its own or as a side dish to meat, chicken or fish.

Rice and Beans (Wali Maharage)


This is roughly based on East African flavours.  And is flexible enough to be adapted to what you have on hand.  For instance, we almost always have carrots in ours, which would not be traditional.  We eat this once or twice a week.  It is inexpensive, yet full of flavour and protein.  For a heartier meal, this can be served with spicy fried prawns (shrimp) or some grilled meat.  In Tanzania this might be eaten with your hands, but you can use a spoon!

For the Rice:

The rule in our house, according to my Other Half, is that the rice needs to be basmati and preferably Tilda brand.  (I prefer brown rice, but we have to compromise on occasion).  You can actually serve the beans with plain rice of any type if you prefer.  But we always like to spice things up a bit.

  1. Measure out your rice per person and rinse in a sieve or bowl of cold water. 
  2. Boil your kettle.
  3. Toast your spices in a dry saucepan for a few minutes.  Choose any combination of the following: 3-4 cloves, 3-4 cardamon pods, chunk cinnamon bark, some cumin seeds.  We usually stick to two spices. The spices should start smelling nice, but not burn.
  4. Add the rice and boiled water.  Cook rice according to the package instructions. Some people add extra water and sieve later.  Some people follow the package instructions and measure the exact amount of water, which is then absorbed by the rice.   
  5. If you are feeding this rice to children, try to remove the spices from the rice or their portions.  You can warn the adults there are spices in the dish.


For the Beans:

Tin of beans, (any kind, but we love pinto beans), rinsed and drained
small tin of chopped tomatoes, or 2-3 small fresh ones
1/2 tin coconut milk
carrot
sweet/bell pepper
onion
hot chilli (optional--since I don't like chilli, we leave it out and people can add hot sauce afterwards)

You can add other vegetables if you like.  We like mushrooms or green beans in this dish as well when we have them or they need using up!

  1. Chop the onion and fry in a saucepan in a little bit of oil.  When soft, add chopped carrot and pepper, and any other vegetables, including chilli, if using.  Fry for 3-5 minutes to soften the vegetables.
  2. Add the beans and the small tin of tomatoes with their juice and continue to cook over medium heat for ten minutes.
  3. Add about half a tin of coconut milk and simmer for a further 2-3 minutes, stirring constantly, just to heat through.  If you heat the coconut milk too long it will separate.
  4. The vegetables and beans should be both hot and tender.
  5. Serve with rice.
  6. This keeps well for the next day as well. (Cook once, eat twice!)


Tuesday, 28 December 2010

Homemade Baby Food

There are many advantages to making your own baby food.  First and foremost you know exactly what your baby is eating.  It is much cheaper than food in jars, even on sale.  And it tastes so much better.  I have no idea why jarred carrots should taste different to mine, but they do.

The disadvantages include the fact that it takes a bit of your time and your baby just might reject the jar of food you try to feed him or her when you are out and about.  (My son had a few jarred foods I could rely on for him to gobble down whilst out).

If you cook already, it really isn't that much of a problem to make extra for the baby.  To begin with babies start with rice cereal or something similar.  But shortly after this you can start single vegetable purees.  My doctor told me to start with vegetables.  She told me that babies always like fruit, but if you give them apple first, they may prefer the sweetness and reject peas. Most people agree: start with carrots.

You need to gather some equipment:

Ice cube trays
plastic freezer bags
or plastic food containers
mini food processor
saucepan

I find it easier to either fit the cooking into my nightly meal prep or find a bit of time each week to dedicate to the task.

When you have a bunch of carrots on hand, steam or boil them until tender.  Pop them in the mini food processor.  (I have an attachment for my stick blender).  Puree using a bit of the cooking liquid if need be.  In a few months you will be blending this leaving a few chunks.  Put the puree in the ice cube tray.  Let this cool and cover in plastic wrap.  Freeze until firm.  Pop the carrot cubes out and put them in a plastic bag or box with lid.  And back into the freezer.

Repeat this process with spinach, butternut squash, sweet potato, peas, apple, pear, peaches, green beans, and parsnips.  Not all at once!  Just as and when you can put a pot on the stove. 

I have a small drawer in the freezer where I have my baby food cubes.  When I want to rustle up a baby dinner I grab two carrot cubes and one spinach.  Or one apple, one green bean, and one courgette.  Or whatever appeals. 

Some baby books recommend trying one food at a time for three days.  And some baby books say to never feed a baby the same thing within three days.  You can read up on all of that and make your decisions.  I know there are a lot of allergies out there.  I even know of a child who is allergic to onions and leeks.  But most babies are not allergic to peas and carrots. (Fruit allergies are the next big thing I hear). 

As your baby grows, you need to make sure your foods are lumpier and before you know it you will simply be mashing what you are cooking for your dinner----before you add salt to the recipe. 

This is just a taster.  If making your own really appeals then you can get some good books out there.  Annabel Karmel's books will become your bibles.  But there are loads of baby food books out there with great ideas for weaning, toddler meals, and family meals to appeal to adults too.

Monday, 27 December 2010

Bolognese (sort of) and chapati

When my lovely Other Half moved to the UK he learned to love Sunday Roast Dinners and Arsenal football.  But there are some things he just doesn't do.  Like sandwiches.  And pasta.  And so he has invented a new dish for us.  He uses an adaptation of my brother in law's bolognese recipe (the best I have ever had) and some traditional foods from his native Tanzania.  The basic bolognese has two secret ingredients:  Smoked paprika, and fried mushrooms, added just at the end.  I am not sure where my brother in law discovered the recipe, so I cannot credit anyone else.


Following my cook once, eat twice philosophy, we try to make enough to have two meals or more.  The flavours are really nice the next day as well.  And this freezes well.
You will need:

oil
1 onion
1 crushed garlic clove
500 g Mince--beef, turkey, or even cooked lentils
1 tsp smoked paprika
1 tsp Season-all, or to taste
1-2 tsp Mixed dried Italian herbs
2 tins chopped tomatoes (you could use a jar of pasta sauce if you are in a hurry)
2 cups stock or stock cube--to match your meat (beef, chicken, etc)
4-5 mushrooms
3/4 cup peas
chapatis--homemade or store bought

1.  Fry the onion and garlic in a little oil until softened. 
2.  Add mince and stir until browned.
3.  Add spices and herbs and stir for another minute.


4.  Add tomatoes or sauce.
Note:  You could simmer this for 10-20 minutes and then move to step 6 if you are in a hurry.
5.  Add stock and let simmer or place in a low oven or crock pot for 30 -60 minutes.  You can leave this longer.  The longer the better.
6.  Slice and fry the mushrooms.
7.  Place the peas in a large mug with some warm water from the kettle.  Microwave for 1-1.5 minutes.


8.  Before serving add the peas and mushrooms to the meat.


9.  Warm the chapatis either wrapped in foil in the oven or one at a time in a frying pan.  You can warm them dry or with a bit of butter until soft, but not crispy.


The meat is eaten with the chapati, rather than utensils.  You simply rip pieces of the bread and use them to scoop up the sauce.  It does takes practice!

Saturday, 25 December 2010

Cook once, Eat Twice: Beef


I  grew up with a healthy appreciation for leftovers.  My father has an impressive collection of Tupperware, Rubbermaid, and margarine tubs.  I go more for a mixture of ice cream tubs and Lock-n-Lock.  I have also fallen in love with these pyrex glass baking dishes which come with plastic lids.  I fill them with macaroni and cheese, shepherd's pie, and chicken casseroles, then pop them in the freezer.  When I get home from work I can take one out and stick it in the oven for half an hour (plastic lid off of course).  My mother has some which have a glass lid and a plastic lid.  I can't find them in the UK, but continue to look.  They are also great for brownies and marshmallow crispy treats.


Pyrex

I love to cook once and use the ingredients for several meals.  I especially like it when I can use the ingredients and make new meals, not just reheating my roast dinner.  I am always on the search for ideas on how to spread my Sunday roast dinner over a few days.  It saves time and money.  Yesterday silverside beef joints were half price, which is even better!!

Roast Beef and Cottage Pie


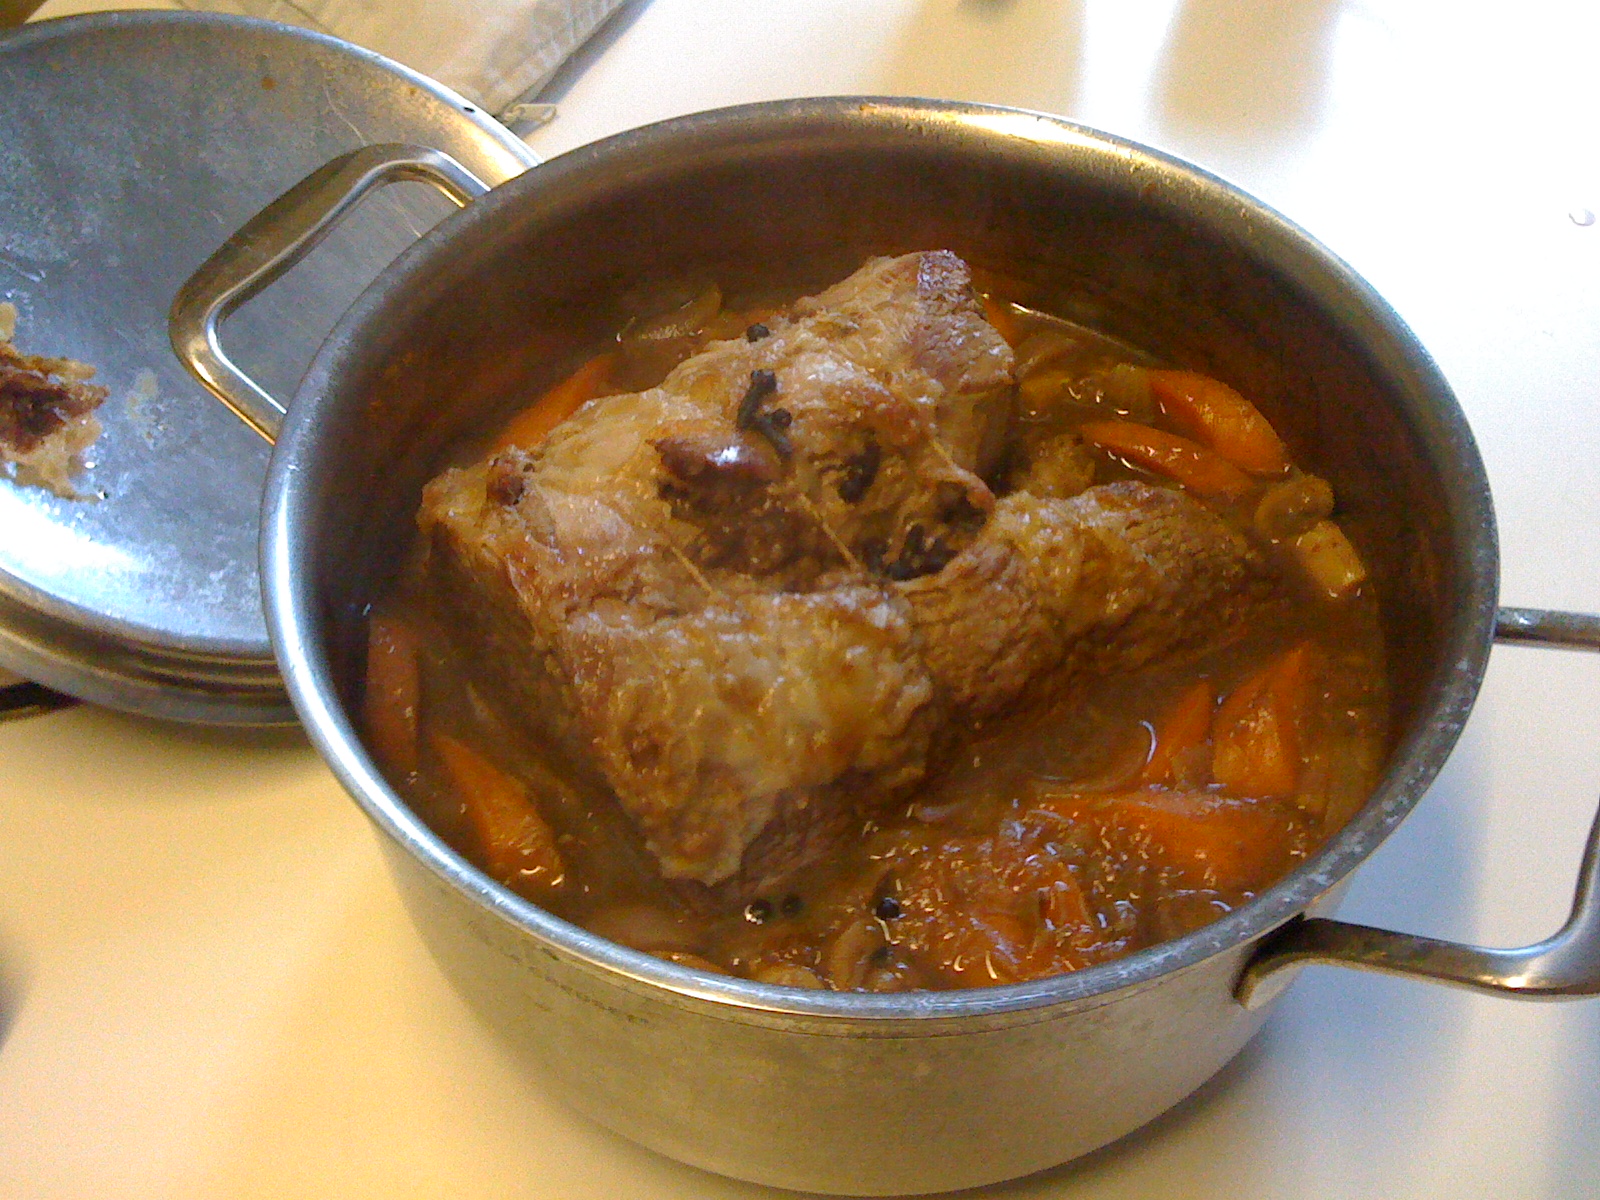
Since I am starting with silverside, which is a leaner roast, I prefer to slow roast or braise it in the lower AGA (or low oven) for most of the day.  If I had a nice roast I would rub it all over with ground allspice and roast it at high heat as normal.

Back to my braise. I have a 2 kg joint which I coat in flour and fry to brown on all sides.  Remove the roast from the pan. 

Add to the pan: (the amounts are optional based on what you have lying around)
sliced onions
sliced carrot (and other root veg if you have any)
mushrooms
two beef stock cubes or beef stock
peppercorns
cloves
fried onions or dried French onion soup mix (optional)
bay leaf
ground allspice (or any other spices you prefer---garam masala, cardamom, turmeric, and chillis work well)

Stir and place the joint on top.  Add enough boiled water to come halfway up the side of the meat.  Bring to a boil and cook covered for an hour on the stovetop or in the top roasting oven of the AGA.  Most recipes for slow cooking will skip this step.  I find the meat is not cooked through unless I do this.  But you could try to put it straight into the low temperature oven from the boil.

Move to the bottom oven or a low oven and cook for 4-6 hours at 150C/300F/Gas 2.  I check on this occasionally, especially since it is a large joint.  It may need a longer cooking time.  You can cook this at a higher temperature for a shorter time.  The theory is that the meat will be be more moist and tender if you cook it slowly over the day.  We really do whichever one is more convenient on the day.

Vegetables

Carrots and broccoli:

You will need enough carrots for two meals now.  And enough broccoli for one meal.  (I prefer peas in the cottage pie, which I will get to later).

Slice carrots and place in the bottom of the saucepan.  Just cover with cold water.  Cut up fresh broccoli and place on top of carrots.  Cover with lid.  When cooking, the carrots will boil and the broccoli will steam.  Cooking them together saves the washing up and space on the stovetop.


Mashed Potatoes:

You will need enough for 2-3 meals.  Peel and cut potatoes into chunks.  Boil in water until cooked through.  Drain well.  Add pepper, butter, milk and a bit of salt.  (You can use sour cream or cream cheese or grated cheddar if you like.)  Mash.  Serve some with your dinner and leave the rest to cool down.

Peas (for pie):  I take a large mug, fill it with frozen petit pois and some hot water from the kettle.  Pop in the microwave for 1-2 minutes.  Drain. 

Yorkshire Pudding

OK, so I cheat and buy them half the time.   If I am roasting things in the AGA and using it to make veg, etc, the temperature drops too low to make a decent job of it.   The AGA also cooks everything unevenly.  I need to turn things around halfway through cooking to prevent burning.  And you aren't meant to open the door when you make Yorkshire pudding.  Even after nearly ten years I still haven't quite got the hang of the AGA.  When I have a regular oven I promise faithfully to make my own.  Otherwise any standard recipe will do.  I have never in my life had any Yorkshire Puddings which could compare to my Aunt Kate's.  She uses the beef dripping of course.  (She is the only person I know who can also make delicious brussel sprouts).  There is a farm shop near us which have really nice ones also with beef dripping.  Or I use Aunt Bessie's. 

Gravy

You can make a nice gravy simply by using the cooking liquid from the braised meat.

You will need some of it for the pie later as well. 


When the meat is cooked through you can remove it from the pot and serve with carrots, broccoli, mash, Yorkshires, and gravy.

Cottage pie

Slice up the leftover meat and chop into small pieces.  Layer on the bottom of one or two glass baking dishes.  (Since I have started with a large joint and I am only feeding three people today, I can make two pies).  Drip some of the cooking liquid or gravy over the meat.  Next add a layer of peas and then one of carrots.  Spread mashed potato on top.  Making sure the pie is cool, you can now seal it with its lid, or with plastic wrap and then foil.  Place in the freezer or fridge if you want this the next day. 

To reheat, place in the oven for 20-30 minutes for the refirgerated one and 30-40 minutes for the frozen one.  Make sure that the centre is piping hot before serving!