Showing posts with label Crafts for the Home. Show all posts

Sunday, 25 December 2011

The Perfect Christmas?

I think that the Christmases I grew up with were perfect.  Mom made a cooked breakfast of scrambled eggs, homemade hash browns, bacon, and she sprinkled cinnamon in the coffee maker.  We would open presents and stockings, taking turns.  Each present in the stocking was wrapped in paper, adding to the anticipation and excitement.  We then went to Mass where I sang in the choir.  Then off to Dad's house where we had mounds of presents and tons of relatives.  Food, the fire, and family games like Trivial Pursuit kept us entertained for hours. 

My family seems so very far away now that I am living in the UK and they are mostly back in the USA.  Sure, I get a phone call or two, but it isn't quite the same.  It does occur to me that even if I was there, I might not experience Christmas in quite the same way as I did back then.  Holiday treveling, especially with small children might not be so appealing anyway.  Being grown up often means a lot more cooking, cleaning, and paying the enormous bills for it all.  Oh, it is all too easy for me to fall  in the trap of negativity. 

So in planning my perfect Chrsitmas this year, I took a look at what we have.  I have me, a five year old, and an 8 month old baby.  (Daddy is working on the 24 and 25th this year).  I have a few things for our stockings, a great Christmas tree.....and two days on our own, with little interruption. (OK, this seemed a tiny bit depressing a week ago, but today it seems like a nice break from the hustle and bustle).

So here is how we are spending it:

We woke at 6.  Well, my son woke earlier and I distracted him in the kitchen with some breakfast until his father got up for work.  Then we opened our stockings.  I then took a hot bath with scented body wash.  Then I got into clean pajamas and my new slipper socks.  (OK, this is partly for the luxury of spending more time in pajamas, but mostly because I am REALLY behind with the laundry.)

We have been playing really.  Yesterday we made gingerbread and a snowflake garland.  We also tried out our new Party Penguin which makes snow cones.  And tucked into our gingerbread.  I was half intending to go to church, but I had to lend my car to the Other Half since his car wouldn't start.
Simple homemade garland is a fun activity and adds the festive touch!


He has been playing for hours---completely ignoring all of the Christmas movies on the television!

Gingerbread barn and animals

I don't have a great big meal planned.  We don't care for turkey, anyway.  And tomorrow we will have some roast lamb (raised here on the farm), with roasted winter veg.

Wednesday, 9 March 2011

Button Quilt


I made this quilt with the help of my mother.  Or maybe to help her out!  She was making a cull of her fabric stash and decided to cut tons of them up into squares.  She also had some fabric samples, so we made all of the squares the same size.  Then we made a number of quilts intended to go to charity.  For some of the quilt tops I made elaborate trees, some hearts, all sorts!  This one was just a mix of pleasing colours.  Mom finished it off tying it with a button in each square.  (I am terrible with sewing buttons on!).  This one came with me to the University of New Hampshire and sat on my bed for four years.  For a young child I would skip the buttons in case they are a choking hazard.

Oh, to make sewing squares easier I used the method from my Quilt in a Day--log cabin pattern book.  It is superquick!  I will have to write a post on it the next time I use it so I can illustrate with photos.

Blue Baby Quilt--Cottage Quarters


I love this method of stacking the deck.   You basically cut the number of squares required, stack them up.  You then cut the pattern in the squares.  Then shuffle the squares according to the directions.  And next you sew the bits together.  It is easier than it looks!

This is a baby size quilt made mostly from old shirts and a few blues.  The batting is a lovely cotton and it is hand tied to finish.


Barn Raising Quilt (Log Cabin)


I made this quilt using Eleanor Burns' Quilt in a Day book on making log cabin quilts.  OK, maybe a day is exagerating, but not by much.  I love this method and would love to have more of her books.

Log cabin quilts were traditionally made using a small red square in the centre to represent the hearth.  Then three dark strips and three light strips were added around the hearth in an alternating pattern to make up the house.  Each square could then be sewn together in a variety of patterns.  I love Barn Raising, which is square. 

For my quilt, I adapted her basic Barn Raising pattern by a.) making more narrow strips, b).  using four light and four dark colours, and c). by using all of the same fabric for my light strips.  I think it has quite a pleasing effect and it made cutting and piecing that much easier to not have to deal with too many patterns.  The Quilt in a Day methods are so great, and with rotary cutting, quilts are really quite easy to make. 

Once you have learned some of the basic rotary cutting methods, piecing methods for making the blocks, AND piecing methods to sew your squares together in a jiffy, you can use these techniques for life.  I have made several other quilts, designing them myself once I learned these basics. 

The way this quilt is made gives you a couple of leftover squares.  This is handy in case you have made a mistake.  But it is also handy to make some additional cushions to match your quilt or use as gifts.


These have been jumped on a fair bit!  I added more strips as borders to these two using leftovers.

Red Baby Quilt

I made up the design by cutting equal width strips from scraps (using a rotary cutter).  Then starting in the middle and sewing on strips until I reached the size I like.  The method is used to make log cabin quilts as well.  It is such a great way to use up some scraps without being too fussy as well.  I hand tied it to quilt the top and bottom together.  This is probably the quickest quilt I have ever made.  I meant to sell it or use it as a gift.  But it ended up on the hall bench one Christmas and I love it there now.........

Mosaic Angel Tray

I made this a few years ago with a group I was teaching.  No instructions this time, just a photo for inspiration.


Tuesday, 25 January 2011

Homemade Sanitary Pads

I have been using cloth menstrual pads for many years, but they can be quite expensive to purchase.  Of course you can make them yourself and there are a large number of patterns on the Internet. 

Here are a few good websites to check out:

HillBillyHousewife
SleepingBaby
Ask Pauline---she has a great list of sites and patterns she has researched


And if you are making some anyway, check out my post on donating sanitary pads to women and girls all over the world who cannot afford sanitary protection.

Thursday, 13 January 2011

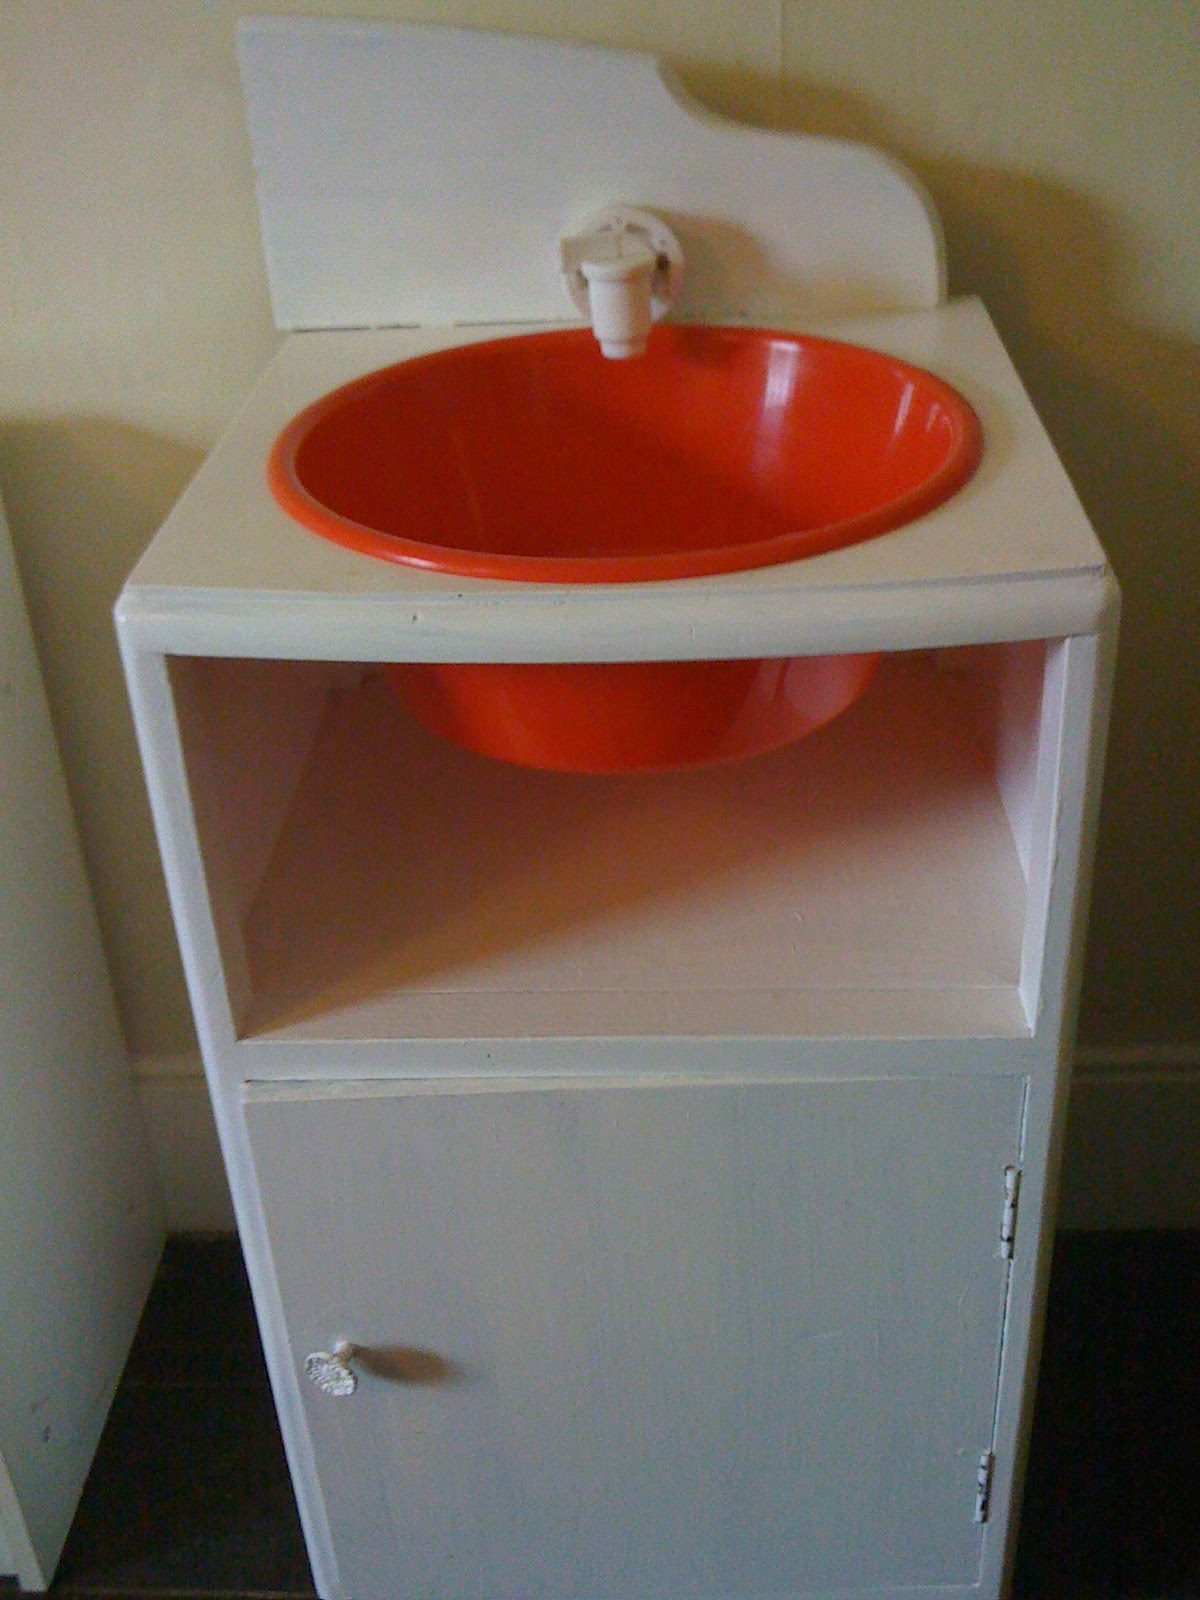
Kids Kitchen


I created this kitchen using a few old bedside tables.  The wooden ones needed to be sanded down and painted.  The middle one was already white.  A friend of mine painted stove burners on the top of hers.  I decided to use black paper circles and clear contact paper (also called sticky back plastic).


 I also created an "oven," and dials.


 My cooker/stove is called "Hotspot" and the fridge is called "Frigi," which means "fridge" in Swahili.


The trickiest bit was the sink.  I asked a friend for help.  He used a jigsaw to cut out a hole which would fit the basin I had.  He also found an old spigot in his workshop and attached it with No More Nails I think.  I was going to use a pipe or a block of wood until he found that.  You can get spigots in places like Wilkinsons where they sell wine making equipment.


I haven't quite finished the knobs on the stove top.  I have collected 6 bottle caps from soda water and intend to fix them on with nuts and bolts, so they turn.  Of course I have been planning to attach them for two years now.

I think this cost about £10 for the paint.  I had the bedside tables already, looking old and worn.  Oh, and £1 for contact paper which looks like a wood countertop. 

Monday, 10 January 2011

Mosaic Star--Craft Gallery

I love this star.  A friend gave it to us and it takes pride of place on our mantle.  I especially like homemade gifts and ones from the heart.

Quotes


This project is so simple, yet so effective.  Pick your favourite quote, print it out in an interesting font and colour.  Mount in a nice frame.  When I get stressed this reminder helps me stop and put things in perspective.

Patchwork Heart Picture


You can make your own art at a fraction of the cost.  You will need for this project:

Picture frame with mount (this one is from IKEA for about £16)
Scraps of red paper from magazines, cards, etc.  (or colour of your choice)
Glue
Spray mount (optional)
Masking tape
Scissors
White card larger than the centre mount
Two pieces of white paper or card, cut to fit the size of the centre square


  1. Begin by cutting all of the red paper into approximately one inch squares.  They can be a bit rustic if you like.  For the best effect choose papers of different textures.  I found some shiny card, some dark red with ridges, thin construction paper, and a variety of shades from magazines.  (This process took me a few weeks to find enough squares).
  2. Take one of the white pieces of paper or card and begin to glue the squares on in rows.  They can overlap slightly.  Try to fill the paper as much as possible.  Allow to dry thoroughly. 

3.  Taking the other white piece of paper, cut out a heart shape:  Fold the white paper in half, then cut a half heart.  Unfold to reveal the whole heart.  Place it in frame to make sure you like it.


4.  Place the heart on the patchwork squares and VERY CAREFULLY cut out.


5.  Next, mount your patchwork heart onto the card, ensuring it fits into the mount nicely.  (I find this to be the hardest bit).  Secure the card to the back of the mount with tape. 
6.  Try this in the frame to make sure it fits well.  When it is just right, close the frame.


Monday, 27 December 2010

Firelighters

When you don't have central heat you rely on your fire for heat from October to May (at least).  We use firelighters a lot and try to buy the "natural" ones which don't have chemicals.  They are perfectly safe for a child to pick up by accident.  Or I make my own.  I once saw similar ones in a catalogue.  They wanted £12 for them I think!  Mine are free. 

When I lived in America I would make firelighters using dryer lint, candle wax, and pine cones.  We don't have a dryer (or lint), or pine cones here on the farm.  So I gather old candle stubs, bits of shredded paper or cardboard, and sometimes spices. 

This is not one for the kiddies!  Unless they have adult supervision.

Firelighters


You will need:

egg carton (cardboard)
piece of foil
bits of cotton wool, dryer fluff, or similar
shredded paper, card
dried citrus peel or herbs (optional)
old candles
tin can
saucepan
scissors


1.  Cut off the top of the egg carton and place the bottom on the foil.  The foil will prevent any wax from dripping on your table.
2.  Fill the egg cups with bits of paper, cotton, peel, etc. 
3.  Place old candles, chopped up in the tin can.  Place the can in a pan of water and put on medium heat.  Watch carefully to make sure the wax melts, but does not catch fire.  (I actually place the wax in an old foil tray in the bottom of the AGA and check on it often instead.) 
4.  Using an oven glove or pot holder, carefully pour the melted wax into the egg cups.  Use only a little in each cup to bind the bits together.  If you overfill the cups, the wax will melt through the cardboard carton onto our foil.  You could light a candle and let it drip over the egg cups, but I have found this method to take a very long time!


5. Leave the egg carton to harden and cut apart with scissors.  They are not necessarily beautiful, but they are effective.


6.  You can save any unused wax in the tin for next time.  And then collect bits of old candles in it.

Saturday, 25 December 2010

Hand Embroidered Cushion---Craft Gallery


I have always loved this saying.  My step-mother has it on a plaque in her house.  I embroidered it free style.  I made this using scraps and fabric from my quilting stash. The cream fabric in the middle is from an old wool blanket.  (You will see bits of it cropping up in several projects).  The pillow is an inexpensive one from IKEA.  I always like picking them up there because they are cheaper, covered and better quality than the ones I can find in the shops near me.  (Considering my interest in crafting, it is really unfortunate that I do not have any good craft stores near by.)  The backing matches the red in the house.

I think that I will be putting this in a frame on the wall soon because it gets quite a bit of wear and tear with my son jumping on the couch.

Friday, 24 December 2010

Brick Doorstop Craft Project


This project was completely free.  If you use an old brick, try to give it a brush or scrub.


You will need:

  • Brick
  • Bubble Wrap and packing tape
  • Fabric--preferably thick (I used an old wool blanket)
  • Small scraps and buttons for decoration
  • Fusible web
  • glue gun or fabric glue
  • Floss, or thread (cotton)
  • Needle
  • Scissors
  • Iron

  1. Start by wrapping your brick with bubble wrap twice over and securing with tape. 
  2. Lay out your fabric and place the brick on top.  Measure out enough fabric to cover the sides.  You can cut some of the corners away to make it easier to sew later.  And cut another piece just larger than the brick to act as the bottom.  See picture.


3.  If you want to applique your decorations to the front now is the time to do it.  If you are using fusible web and/or glue, you can do it now or after you have sewn the fabric to the brick (making sure not to melt the plastic underneath with the iron).  Line the fabric carefully on the brick before you start to make sure your design is in the middle.  I chose hearts with buttons for my first.  I would like to do a row of houses or beach huts for my next one.  If using fusible web, follow the manufacturer's instructions. 

4.  Next, sew the fabric on the brick.  I used coloured embroidery floss on mine.  I really like the rustic, homemade look on mine and so I don't worry how neat it is.  It does however need to be sturdy enough to withstand a bashing as kids and pets walk into it or kick into place.


Additional thoughts:  For my next one I will definitely use some darker colours.  This gets knocked about and dirty as we use it every day.  This has been in place for about six months.  The buttons have come off and had to be replaced because I used glue.  I am not sure if the kids or the cats are to blame!  I will sew buttons from now on.  I am really looking forward to doing another.